How to Convert Apple Live Photo to Video on iPhone, iPad, and Mac (2026 Guide)
Live Photos are great—until you try to share them outside the Apple ecosystem and realize they behave like a confused GIF that refuses to cooperate.
That’s where converting them into a proper video becomes essential. It makes your content shareable on WhatsApp, Instagram, or even Windows devices without losing the motion effect. The good news? Apple has made this surprisingly easy—but there are also smarter, more flexible methods most people overlook.
How to Convert Live Photo to Video (Step-by-Step)
1. Convert Live Photo to Video on iPhone
Time needed: 2 minutes
Quickly convert a Live Photo into a shareable video using the built-in Photos app on iPhone or iPad—no third-party apps required.
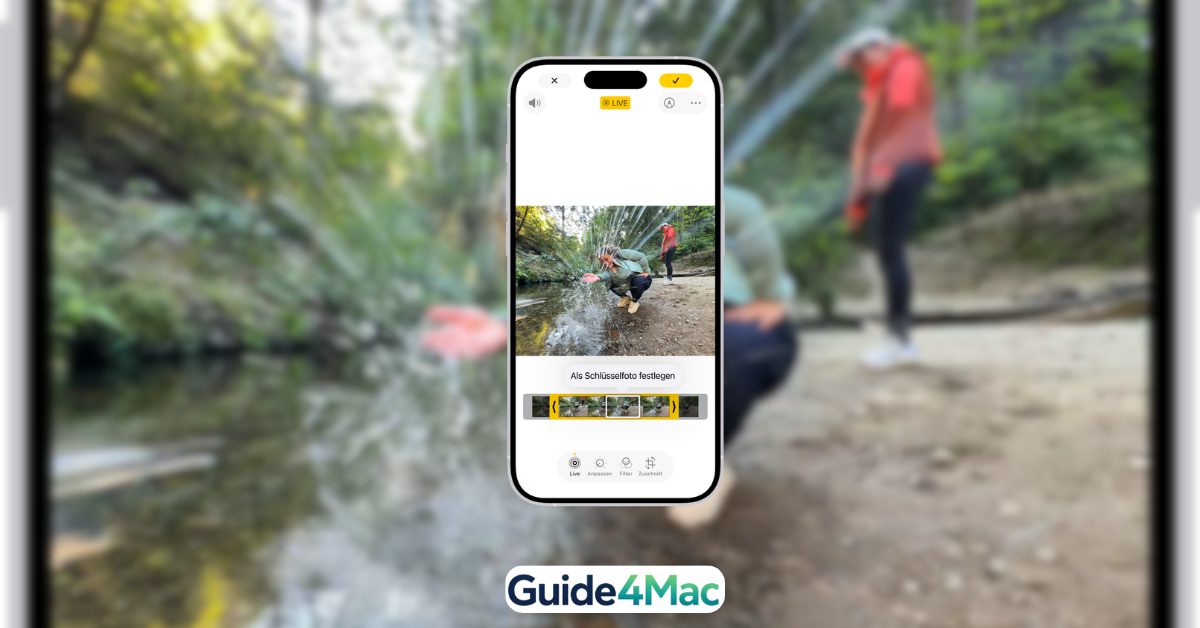
- Open the Photos app
Launch the Photos app and locate your Live Photo. You can also go to Albums > Media Types > Live Photos for quicker access.
- Select your Live Photo
Tap on the photo you want to convert. Look for the “LIVE” label at the top to confirm it’s not just a regular image.
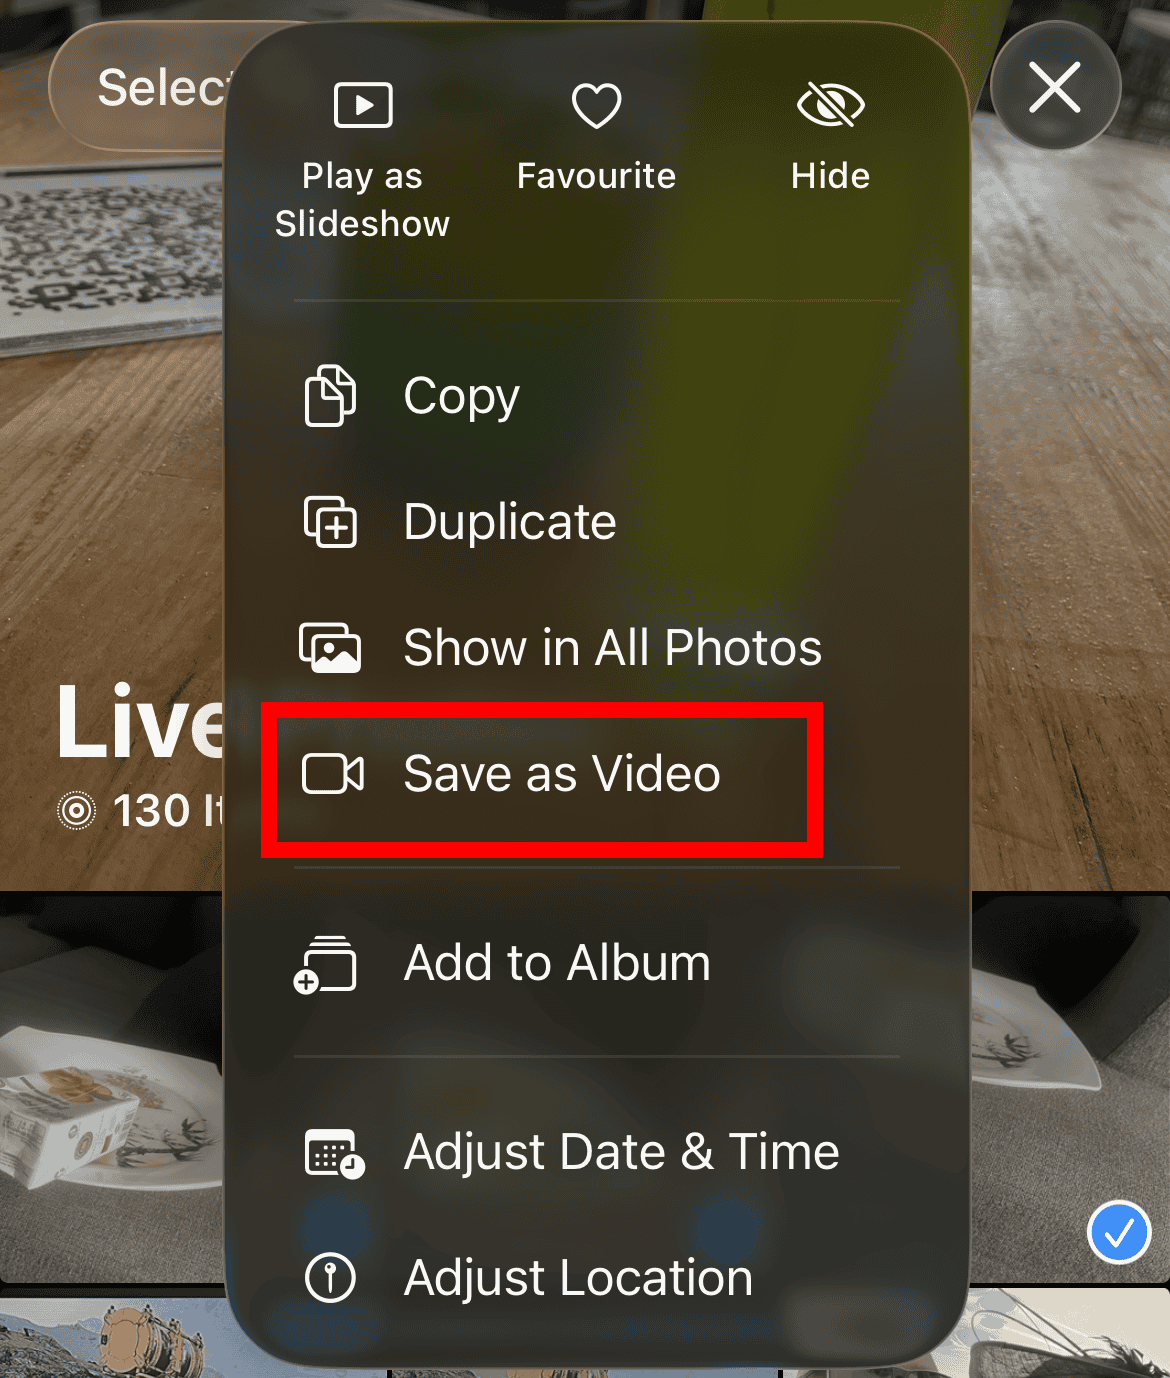
- Tap the three-dot menu
In the upper-right corner, tap the three dots icon to reveal more options.
- Choose “Save as Video”
Tap “Save as Video.” The system instantly converts the Live Photo into a standard video file.
- Locate your new video
Head to your Recents album. The video will appear there, while the original Live Photo remains untouched.
2. Convert Multiple Live Photos into One Video (Batch Method)
This is one of the most underrated features—and perfect for storytelling or travel clips.
- Open Photos and tap “Select“
- Choose multiple Live Photos (they must be consecutive for best results)
- Tap the three-dot menu
- Select Save as Video
- iPhone merges them into one continuous video automatically
This method uses Apple’s internal stitching algorithm, which preserves frame timing better than most third-party apps.
2. Use Shortcuts App for Automation (Power Users)
If you convert Live Photos often, automation is your best friend.
- Open the Shortcuts app
- Tap + to create a new shortcut
- Add action: “Get Latest Live Photos”
- Add action: “Make Video from Live Photos”
- Add action: “Save to Photo Album”
- Run the shortcut anytime to auto-convert
Automation is becoming central to iOS workflows. Apple is quietly pushing Shortcuts as a replacement for manual tasks.
3. Convert Live Photo to Video on Mac
Perfect if you want more control or plan to edit afterward.
- Open the Photos app on Mac
- Select your Live Photo
- Click File > Export > Export Unmodified Original OR use export options
- Choose video format (if available) or open in QuickTime for conversion
- Save the file
Pro tip: Mac gives you more control over file format and resolution—useful for content creators.
4. Use Third-Party Apps (Advanced Editing)
Apps like LivePhoto Converter, CupCut or others allow trimming, filters, and resolution control.
Steps (general):
- Download a Live Photo Converter app from the App Store
- Import your Live Photo
- Adjust duration, filters, or crop
- Export as video
Reality check: Most users don’t need this—but if you’re posting on social media regularly, it’s worth it.
Common Problems Users Run Into
➤ “Save as Video” not showing:
Usually means the file isn’t a Live Photo anymore (edited, AirDropped incorrectly, or downloaded from another app).
➤ Video looks low quality:
Some apps compress Live Photos before conversion, especially when shared via messaging apps.
➤ Can’t find the converted video:
It keeps the original timestamp—so it might be buried in your camera roll.
➤ Live Photo effects not applied:
If you used Loop or Bounce, they don’t always transfer automatically to video.
Fixes and Troubleshooting
- Re-enable Live Photos in Camera before shooting
- Avoid editing the Live Photo before converting
- Restart the Photos app (yes, still works in 2026)
- Update iOS—Apple occasionally tweaks media handling
- Re-import the file if it came from WhatsApp or Telegram
If your media isn’t syncing properly across devices, fixing Apple Mail sync issues can sometimes hint at broader iCloud problems.
Tips to Get Better Results
- Shoot steady: Live Photos amplify shaky hands
- Use good lighting—motion looks worse in low light
- Apply Loop or Bounce before converting for creative effects
- Combine clips for storytelling instead of sending multiple files
- Edit on Mac for higher-quality exports
Video content is prioritized across platforms (Google, Instagram, TikTok). Converting Live Photos into videos increases discoverability, especially when paired with proper file naming and metadata.
FAQs (People Also Ask)
Open the photo, tap the three dots, and select “Save as Video.”
Yes, select multiple Live Photos and use “Save as Video” to merge them into one clip.
Not with Apple’s native tool. Third-party apps may compress the file.
It may not be a true Live Photo or was edited in a way that removed motion data.
They appear in the Recents album but keep the original capture date.
Yes, using the Shortcuts app, you can create a workflow to convert them automatically.

0 Comments