How to Create and Remove Symlinks on Mac (3 Methods)
Symbolic links have been part of Unix-based systems since the 1980s, and macOS inherits that same kernel-level support, meaning a symlink works identically across:
- Finder
- Terminal
- every app on your Mac.
Unlike a regular Finder alias, a symlink is resolved by the operating system itself before any application ever sees it. That distinction matters when you’re dealing with command-line tools, syncing services, or any app that refuses to follow a standard alias. This guide walks you through three ways to create symlinks on Mac, how to remove them, and a few tricks that make the whole process faster.
If you’ve been troubleshooting unexpected file-routing issues, it’s also worth checking out this guide on how to remove a virus on Mac, since some malware specifically tampers with symlinks in system directories to maintain persistence. If you suspect a trojan specifically, our Mac trojan removal guide covers the Library folder and Terminal checks step by step.
Time needed: 20 minutes
How to create a symbolic link on Mac using Terminal, then verify and remove it when no longer needed.
- Open Terminal
Press Command + Space to open Spotlight, type Terminal, and press Enter.
- Type the ln -s command
Enter: ln -s /original/path /destination/path and press Enter to create the symlink.
- Confirm the symlink exists
Navigate to the destination folder in Finder and verify the symlink icon appears.
- Test the symlink
Open the symlink from Finder or an app to confirm it redirects correctly to the original location.
- Remove the symlink when done
Run rm /path/to/symlink in Terminal, or right-click the symlink in Finder and select Move to Trash.
What Is a Symlink on Mac?
A symlink (symbolic link) is a special file that the operating system treats as a transparent pointer to another file or folder stored elsewhere on your Mac. It’s not a copy of the target, and it’s not a simple shortcut. The kernel resolves the link before any application reads it, so every tool, including Terminal, Xcode, sync clients, and Finder, sees the target as if it were sitting right at the symlink’s location.
A Finder alias, by contrast, is resolved by the Finder process alone. That’s why aliases break when accessed from Terminal or from apps that bypass Finder. Symlinks don’t have that limitation. The resolution happens at the kernel level, making symlinks compatible with every process on the system.
One practical use case: redirecting an app’s data folder to a different drive without touching the app itself. Create a symlink at the app’s expected folder path, pointing to your new location. The app writes and reads files as normal. All the data ends up exactly where you want it.

How to Create a Symlink Using Terminal On Mac Or Macbook?
Terminal is the fastest and most reliable way to create a symlink on Mac. The command is ln -s, followed by the original path and then the destination path. You need both paths before you start, but there’s a drag-and-drop trick below that fills them in automatically.
1. Open Terminal on Your Mac
- Press Command (⌘) + Space to open Spotlight Search.
- Type terminal and press Enter when the Terminal app is highlighted at the top of the results.
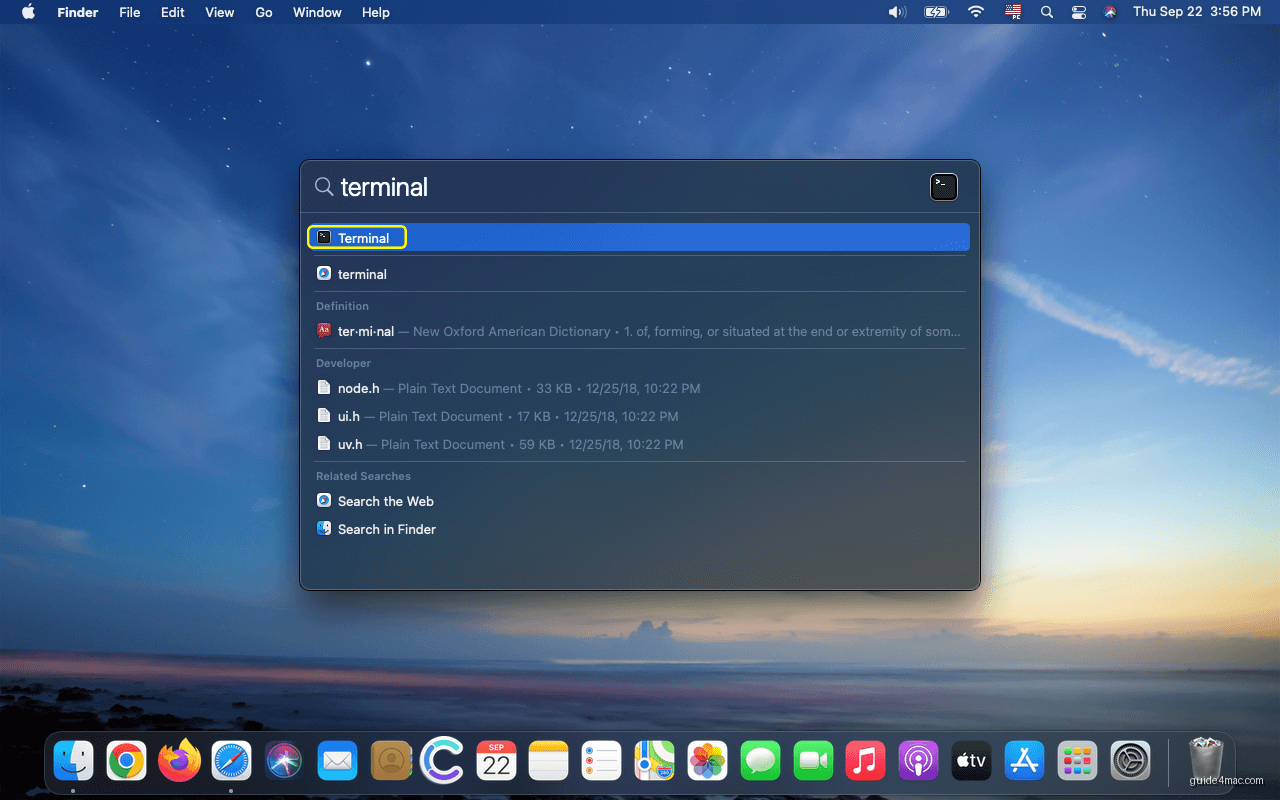
Alternatively, open Finder, click Go in the menu bar, select Utilities, and double-click Terminal to launch it.

2. Run the ln -s Command
The syntax for creating a symlink is: ln -s /original/path /destination/path. The first path is the item you want to link to. The second path is where you want the symlink to appear, including the name of the symlink itself.
- In Terminal, type your command using this format:
ln -s /original location /destination location. For example, to create a symlink for your Documents folder on your Desktop:ln -s /Users/admin/Documents /Users/admin/Desktop - Press Enter. The symlink appears at the destination path immediately.
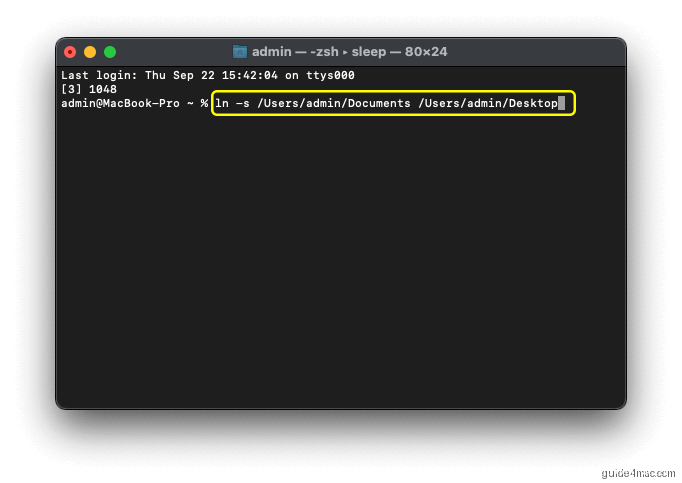
- Switch to Finder and navigate to your destination folder to confirm the symlink is there.

3. Handle Paths With Spaces or Special Characters
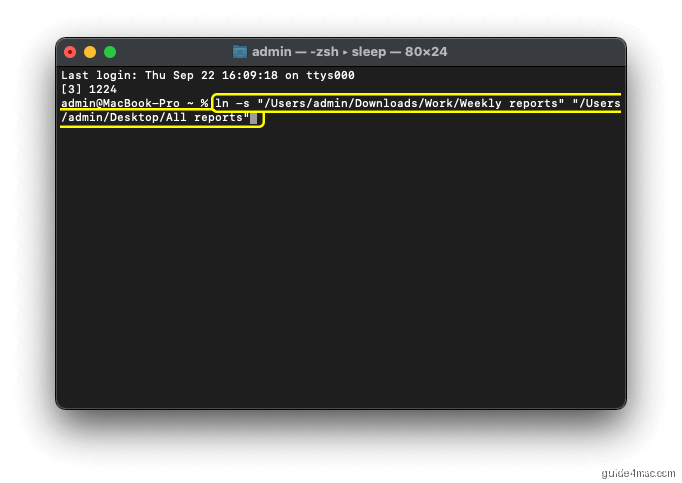
If either path contains spaces, wrap the entire path in quotation marks. Without quotes, Terminal splits the path at each space and the command fails. This applies to both the source and destination paths.
- Wrap paths that contain spaces in double quotes. For example:
ln -s "/Users/admin/Downloads/Work/Weekly reports" "/Users/admin/Desktop/All reports" - Press Enter to create the symlink.
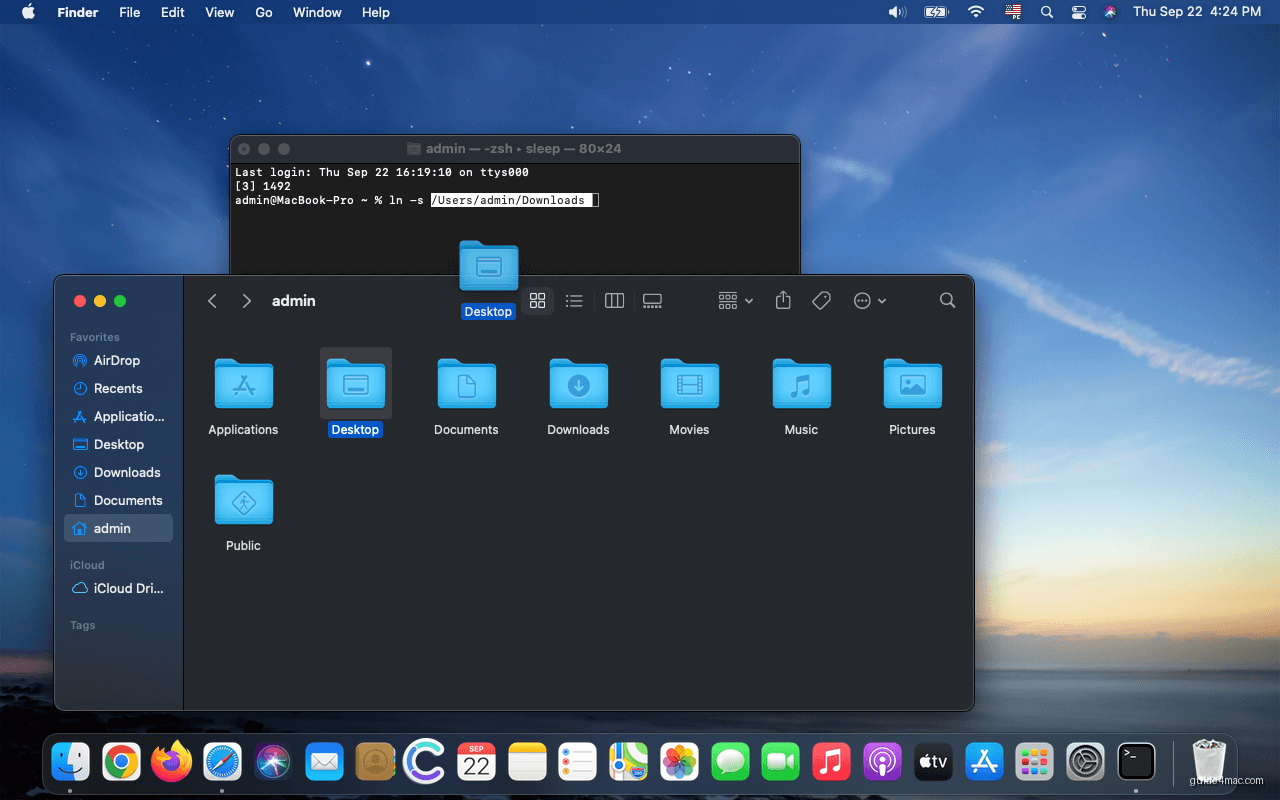
4. Auto-Fill Paths by Dragging Folders Into Terminal
Typing long paths manually is error-prone. A faster method is to drag a folder or file from Finder directly into the Terminal window. macOS auto-fills the full path, including any required escape characters for spaces.
- Type
ln -sin Terminal (include the trailing space). - Drag the original folder from Finder into the Terminal window. The full path appears automatically.
- Add a space after the auto-filled path, then drag the destination folder into Terminal the same way.
- Press Enter to create the symlink.
How to Add a Symlink Option to the Finder Right-Click Menu?
Creating symlinks one by one in Terminal works fine for occasional use. If you create symlinks regularly, adding a right-click option to Finder is far more practical. You build this once using Automator, and the option appears in the contextual menu for every file and folder on your Mac from that point on.
1. Create a Quick Action in Automator
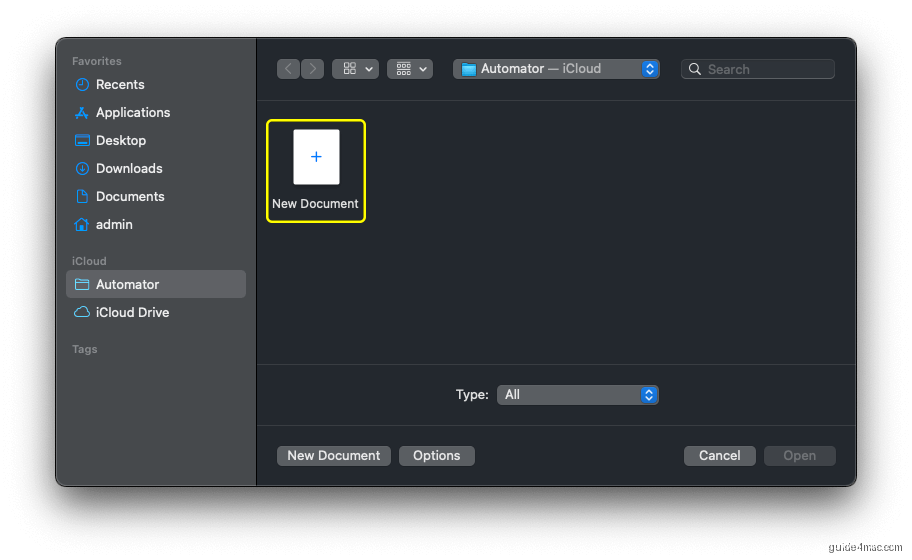
- Press Command (⌘) + Space, type automator, and press Enter.

- When Automator opens, click New Document.
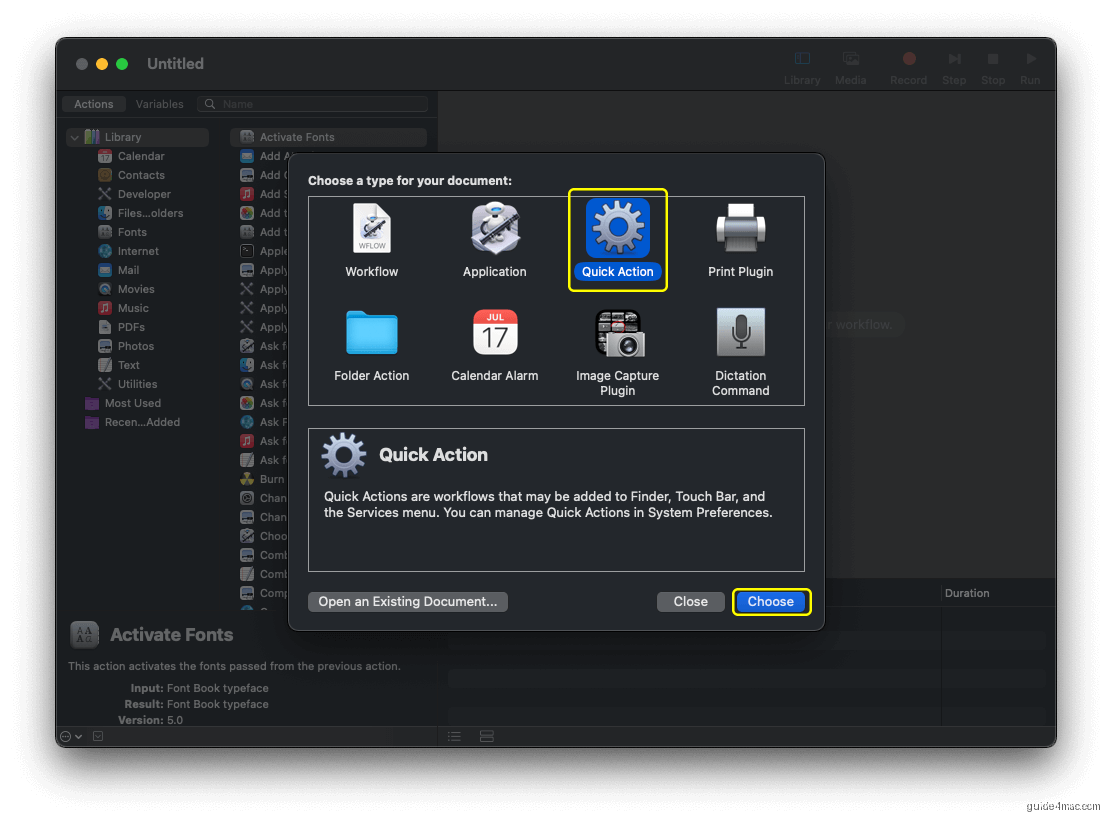
- Select Quick Action from the document type list and click Choose.
- Set Workflow receives current to files or folders. Set the application dropdown next to it to any application.
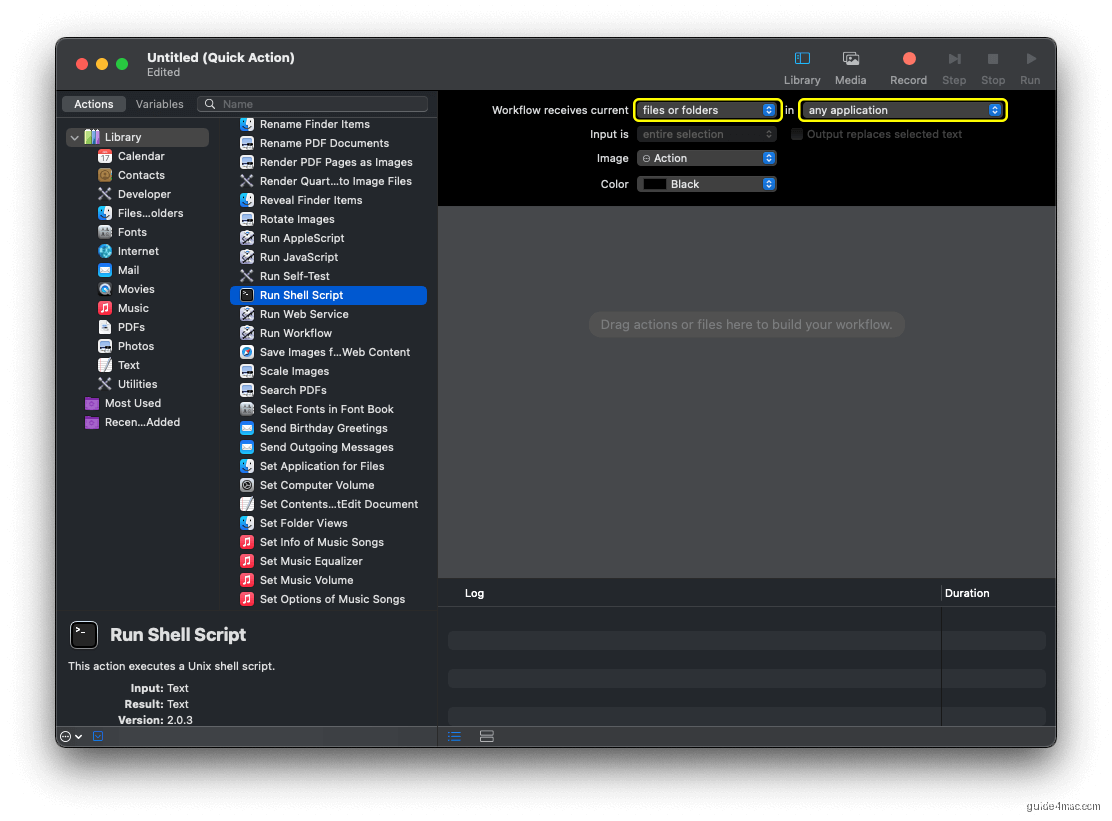
- In the Actions search bar on the left, type Run Shell Script. Drag the Run Shell Script action into the workflow area on the right.
- In the Run Shell Script action block, change the Pass input dropdown to as arguments.
- Clear the default script text and paste the following script:
while [ $# -ne 0 ]; do
ln -s "$1" "$1 symlink"
shift
done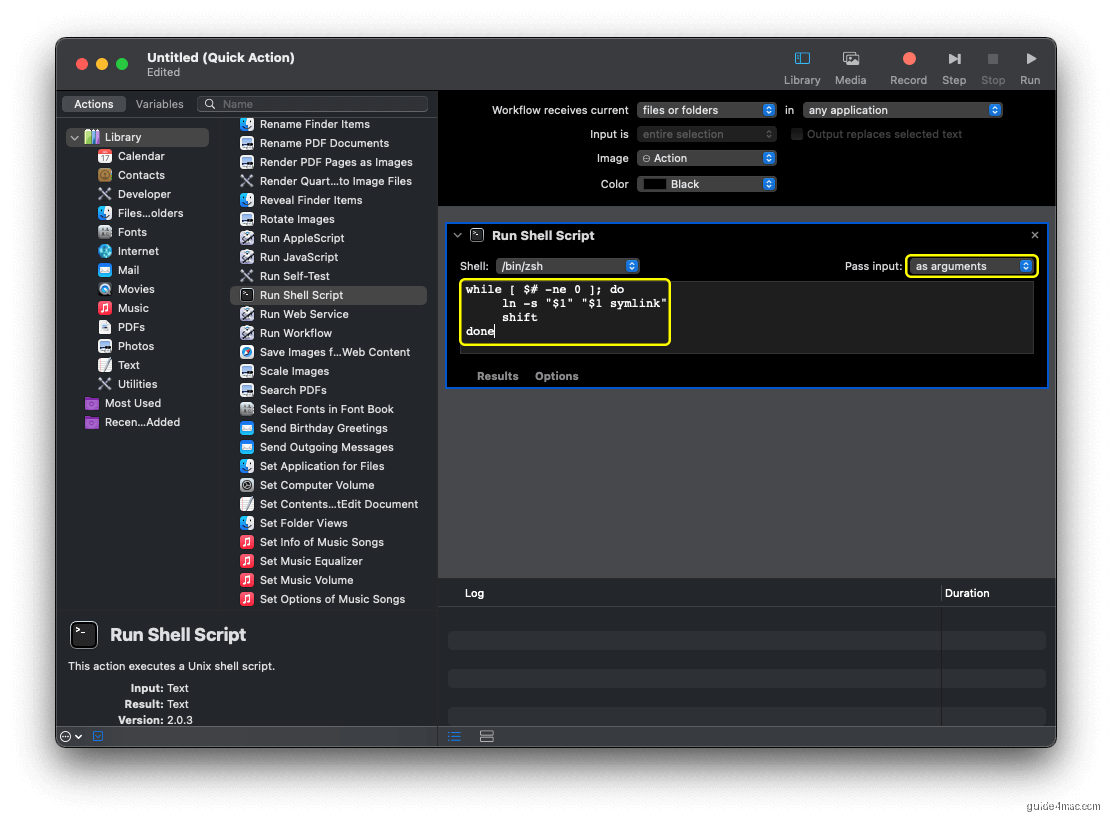
- In the Automator menu bar, click File, then click Save. Name the action (for example, Create Symlink) and click Save.
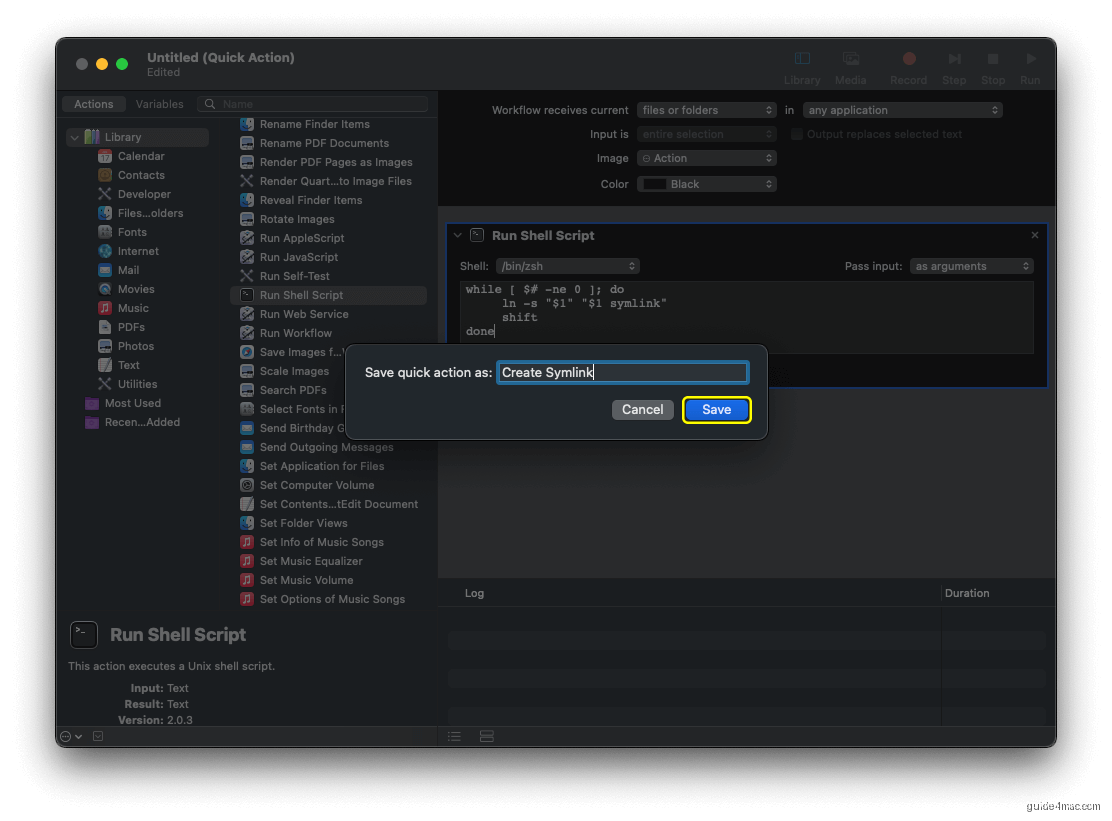
The Create Symlink option now appears in the right-click (control-click) contextual menu in Finder whenever you select a file or folder. Right-click any item and the new action is listed under the Quick Actions submenu.

2. Remove the Quick Action From Finder
If you want to remove the symlink option from the contextual menu later, two methods work. The first uses Finder to delete the service file directly.
- Open Finder and press Command (⌘) + Shift + G to open the Go to Folder dialog.
- Type
~/Library/Servicesand press Enter. - Locate the symlink service you created, right-click it, and select Move to Trash.
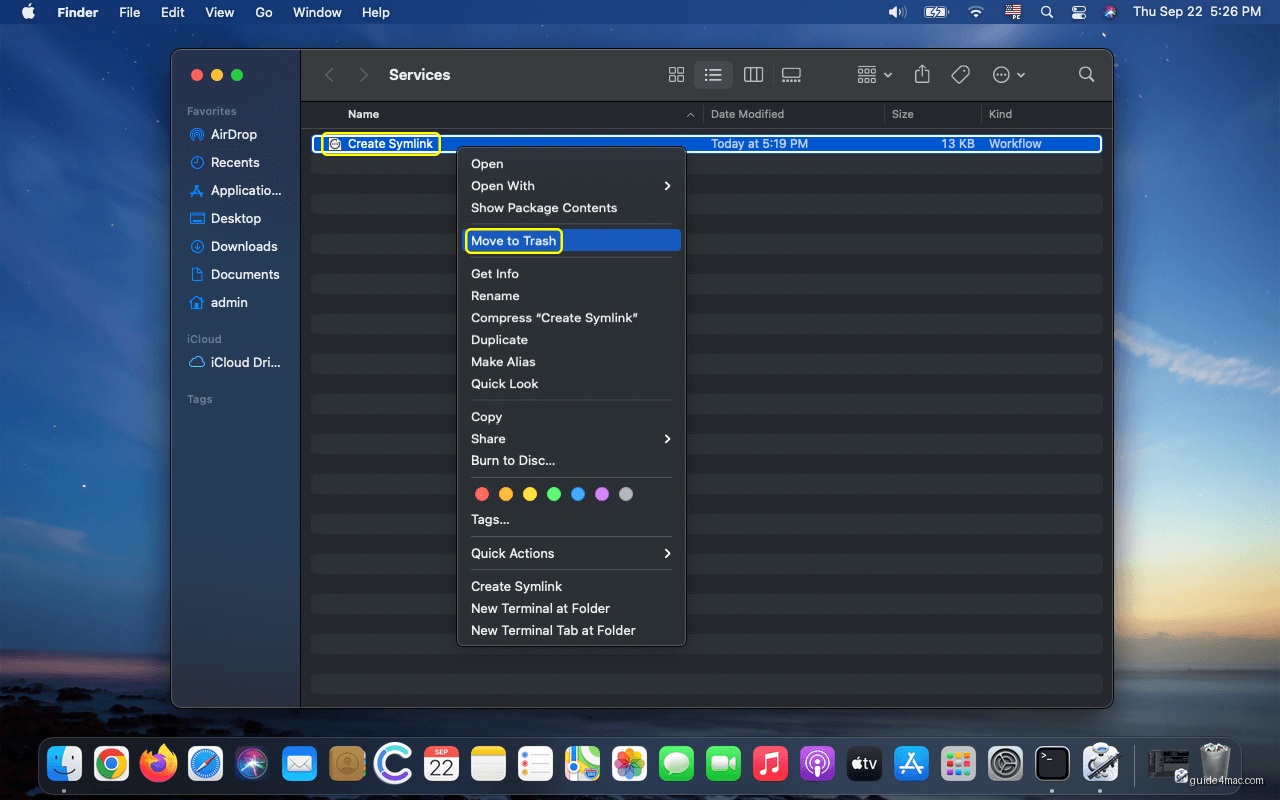
The second method uses System Settings (macOS Ventura and later) or System Preferences (macOS Monterey and earlier).
- Open System Settings (or System Preferences on older macOS versions).
- Go to Privacy & Security, then Extensions, then Finder. On macOS Monterey and earlier, go to Extensions directly from the main System Preferences window.
- Uncheck your symlink quick action in the list.
- Right-click it and select Move to Trash to delete it permanently.

How to Remove a Symlink on Mac or Macbook Easily?
Removing a symlink deletes only the link itself. It never touches the original file or folder the symlink pointed to. This is an important distinction: the rm command on a symlink is safe because it targets the pointer, not the data behind it.
How To Remove a Symlink Using Terminal On Mac?
- Open Terminal using Spotlight or from Finder > Go > Utilities.
- Type the removal command in this format:
rm /symlink/location. For example, to remove a Desktop symlink pointing to the Documents folder:rm /Users/admin/Desktop/Documents - Press Enter. The symlink disappears from the destination. Your original Documents folder remains untouched.
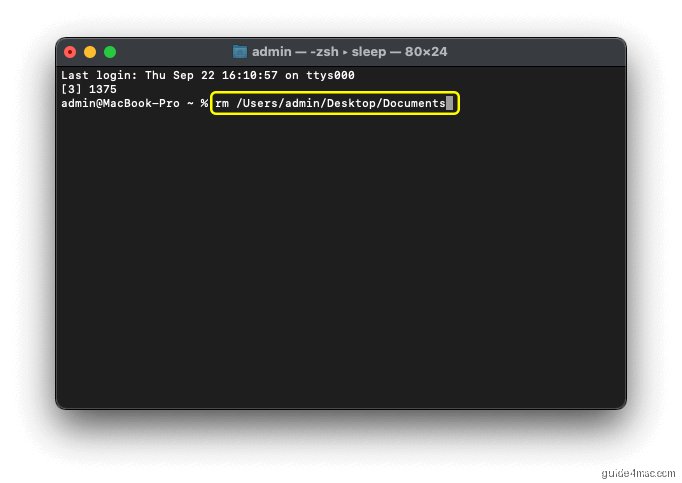
How To Remove a Symlink Using Finder On Mac?
- Locate the symlink in Finder.
- Right-click the symlink and select Move to Trash. Do not double-click it first, as that opens the linked target instead.
- Empty the Trash to complete the removal.

Symlink Tips, Limitations, and Common Mistakes
Symlinks are powerful, but a few behaviors catch people off guard. Knowing these ahead of time saves a lot of debugging.
Broken Symlinks
A symlink breaks the moment the original file or folder is moved or deleted. macOS does not update the symlink automatically. In Finder, a broken symlink still displays the link icon, but double-clicking it produces an error. To fix it, delete the broken symlink and create a new one pointing to the updated path.
Symlinks and iCloud Drive
iCloud Drive does not sync symlinks as symlinks. When you store a symlink inside an iCloud-synced folder, iCloud either ignores it or attempts to sync the content it points to, depending on the macOS version and the app. For reliable syncing of linked content, keep symlinks outside iCloud-managed directories.
Relative vs. Absolute Paths
The ln -s command accepts both absolute paths (starting with /) and relative paths. Absolute paths are recommended for most use cases because relative symlinks break if you move the symlink to a different directory. Always use full paths starting from /Users/yourname/ unless you specifically need a relative link.
Verify a Symlink’s Target in Terminal
To check where a symlink points, use ls -la /path/to/symlink in Terminal. The output shows an arrow (->) followed by the target path. This is useful for auditing symlinks you didn’t create yourself, or for confirming a new symlink points to the correct location before relying on it.
Where Symlink Settings Appear in macOS Ventura, Sonoma, and Sequoia?
The Automator-based quick action you created is stored as a file in ~/Library/Services/. This path hasn’t changed across recent macOS versions. Managing which extensions appear in Finder has moved to a new location in macOS Ventura and later, though.
On macOS Ventura, Sonoma, and Sequoia, go to System Settings > Privacy & Security > Extensions > Finder Extensions to see and toggle your quick actions. On macOS Monterey and earlier, the path was System Preferences > Extensions > Finder. The underlying ~/Library/Services/ folder works the same way regardless of the macOS version you’re running.
Safari’s built-in privacy architecture on macOS has undergone similar navigation changes across major OS updates. If you’re also updating security-related settings, it’s worth knowing that Safari’s privacy features work better than Chrome’s by default on macOS, partly because of how tightly it integrates with system-level controls.
Frequently Asked Questions
A symlink (symbolic link) is resolved by the macOS kernel before any application reads it, making it work transparently in Terminal and every app. A Finder alias is resolved only by Finder itself, so command-line tools and apps that bypass Finder cannot follow it. For developer tools, sync clients, and automation scripts, symlinks are more reliable than aliases.
Open Terminal and run: ln -s /path/to/original /path/to/destination. Replace the paths with your actual source and destination. Press Enter and the symlink appears at the destination path immediately. If either path contains spaces, wrap it in double quotation marks.
No. Removing a symlink with rm or by sending it to the Trash deletes only the pointer. The original file or folder it pointed to remains completely untouched. This applies to both the Terminal rm command and the Finder Move to Trash method.
A symlink breaks when the original file or folder it points to has been moved, renamed, or deleted. macOS does not automatically update the symlink when the target changes. Delete the broken symlink and create a new one pointing to the correct updated path.
Yes. You can add a right-click option to Finder using Automator. Create a Quick Action that runs a short shell script using ln -s, then save it to ~/Library/Services. After that, right-clicking any file or folder in Finder shows a Create Symlink option in the Quick Actions submenu.
Not reliably. iCloud Drive does not sync symlinks as symlinks across devices. It may attempt to sync the content the symlink points to, or ignore the link entirely, depending on the macOS version. Keep symlinks outside iCloud-managed folders if you need predictable behavior.
Run ls -la /path/to/symlink in Terminal. The output includes an arrow (->) followed by the full path of the target the symlink points to. This is the fastest way to verify a symlink’s destination without opening Finder.




0 Comments