How to Remove “Browser Is Infected” Pop-Up Virus from Mac (2026)

- “Browser Is Infected” Threat Profile
- What Is the “Browser Is Infected” Pop-Up on Mac?
- Manual Removal of the “Browser Is Infected” Virus from Mac
- Remove the “Browser Is Infected” Pop-Up in Safari, Chrome, and Firefox
- Detect “Browser Is Infected” Malware from the Terminal
- Where to Find These Settings on macOS Ventura, Sonoma, and Sequoia
- Verify the “Browser Is Infected” Scam Is Fully Gone
- Common Mistakes When Removing the “Browser Is Infected” Scam
- Frequently Asked Questions
Apple’s own threat intelligence data confirms that Mac malware reports have grown year over year since 2019, and browser-based notification scams now represent one of the fastest-growing categories. The “Browser is infected. Attention! Viruses Detected” alert is a malvertising scam that exploits macOS web push notifications to bombard your desktop with fake warnings, even when your browser is closed. It doesn’t carry a traditional virus payload, but it can lead you directly to one if you click anything inside the alert. If you need a broader overview of what Mac threats look like in 2026, the complete Mac virus removal guide is a useful companion to this article.
This article covers exactly how the scam works, how to revoke the rogue notification permission in Safari, Chrome, and Firefox, how to clean related malware files from your Mac’s Library folders, and how to verify the threat is completely gone using Terminal diagnostics. If you saw a similar alert on your phone, read our guide to the “Your Apple iPhone is infected” pop-up scam.
“Browser Is Infected” Threat Profile
| Name | “Browser is infected. Attention! Viruses Detected” pop-up |
| Category | Malvertising, rogue web push notification abuse, scareware |
| Affected Browsers/Systems | Safari, Chrome, Firefox on macOS (any version) |
| Symptoms | Persistent desktop pop-ups with browser logo, fake virus counts, “Remove virus” buttons, alerts appearing with browser closed |
| Severity | Medium: not a traditional virus itself, but actively funnels users toward dangerous downloads and remote-access scams |
| Potential Damage | Redirects to rogue software installers, fake tech-support pages requesting remote access, and credential-harvesting sites |
The recommended manual removal procedure for the “Browser is infected” notification scam on Mac, covering process termination, Library cleanup, profile removal, and browser reset.
- Terminate the suspicious process in Activity Monitor
Open Finder, go to Go > Utilities, launch Activity Monitor, find the unfamiliar resource-intensive process, and click the Stop button to Force Quit it.
- Delete rogue files from Library LaunchAgents and LaunchDaemons
Use Go > Go to Folder in Finder to inspect /Library/LaunchAgents, ~/Library/LaunchAgents, and /Library/LaunchDaemons. Drag any suspicious .plist files to the Trash.
- Remove the malicious app from Applications
Open Finder > Applications, locate any app you don’t recognise or didn’t intentionally install, and drag it to the Trash.
- Delete the rogue configuration profile
Open System Settings > Privacy & Security > Profiles (macOS Ventura and later) or System Preferences > Profiles (macOS Monterey and earlier). Select the malicious profile and click the minus button to remove it.
- Revoke the rogue notification permission in your browser
In Safari, Chrome, or Firefox, open the browser’s notification settings, find the malicious site that was granted permission, and remove or block it.
- Reset your browser to default settings
In each affected browser, reset all settings to defaults to clear any residual hijack of your homepage, search engine, or extension list.
What Is the “Browser Is Infected” Pop-Up on Mac?
The “Browser is infected” alert is a fake security warning delivered through macOS’s own web push notification system. It is not a virus embedded in your browser’s code. It’s a rogue permission that a deceptive website tricked you into granting. If you also installed a “fix” or an update from one of these pages, treat it as a possible trojan and follow our Mac trojan removal guide.
The attack works like this: you land on a fraudulent site that presents a fake human-verification dialog. Instead of the browser’s standard “this site wants to show notifications” prompt, the page dresses it up as a CAPTCHA, telling you to click Allow to prove you’re not a robot. Once you click, that site has full permission to push notifications directly to your Mac’s desktop.
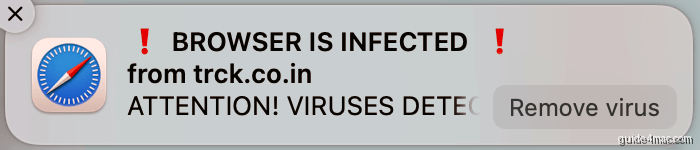
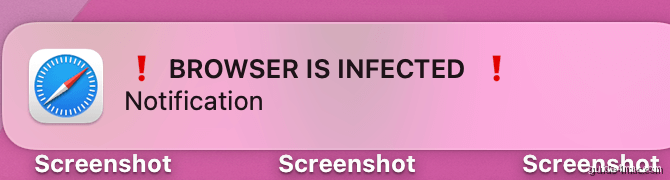
From that point, your desktop fills with alerts carrying your browser’s logo, fake virus counts, and a “Remove virus” button. The alerts appear even when the browser is fully closed, because macOS delivers web push notifications at the operating-system level, not inside the browser window.
Clicking anything inside one of these alerts routes you to a page that fabricates an infection report, then pushes a fake cleaner download or asks you to call a “support” number. Handing over remote access to your Mac at that stage is where the real damage occurs: credential theft, paid-“fix” scams, or deeper malware installation. The scam has been active since early 2024 and follows the same delivery pattern as older notification hijackers like the Ask You pop-up virus.
The fix is targeted, not nuclear. Disabling all notifications system-wide cuts off legitimate alerts from Calendar, Mail, and messaging apps you actually use. The correct approach is to revoke the specific permission from the rogue site, which the browser cleanup section below walks you through. If you also interacted with a linked page and downloaded something, the manual removal steps further down cover that scenario too.
How To Remove Manually “Browser Is Infected” Virus from Mac?
Work through these steps in order. Skipping the Activity Monitor and Library steps and going straight to the browser reset will leave persistence files behind that can restore the infection after a restart.
Step 1: Terminate the Malicious Process in Activity Monitor
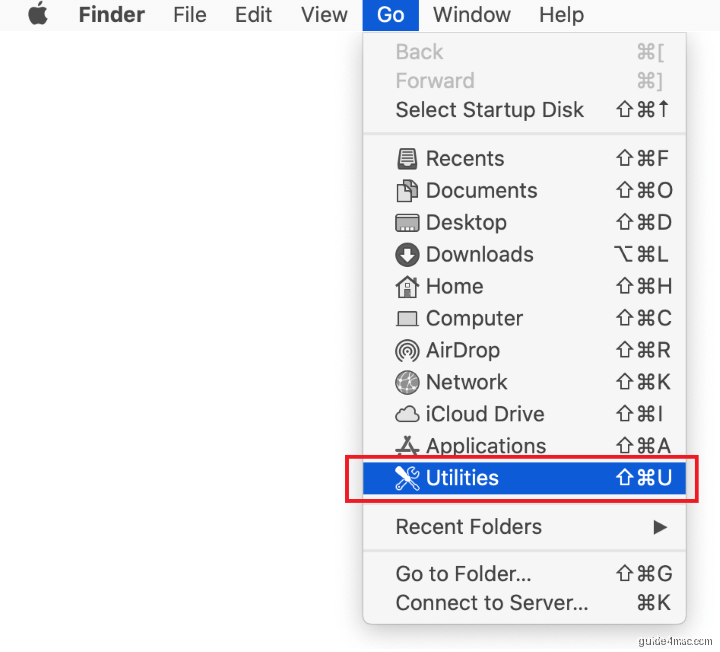
- In Finder, click the Go menu in the menu bar and select Utilities.
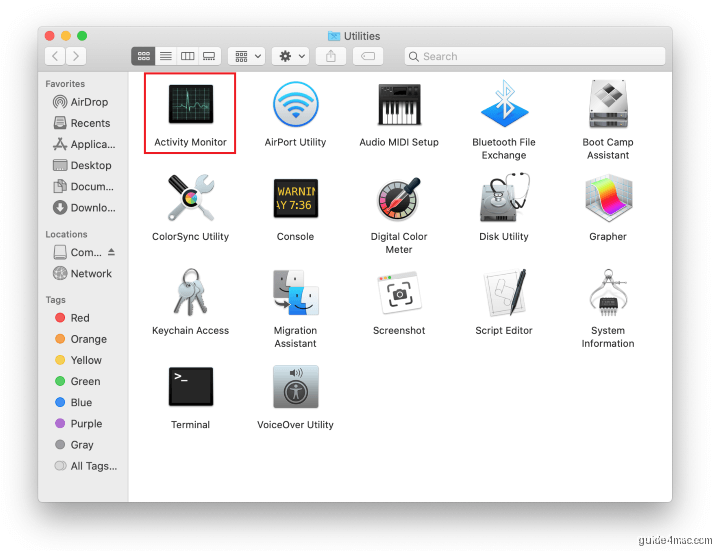
- Double-click Activity Monitor to open it.
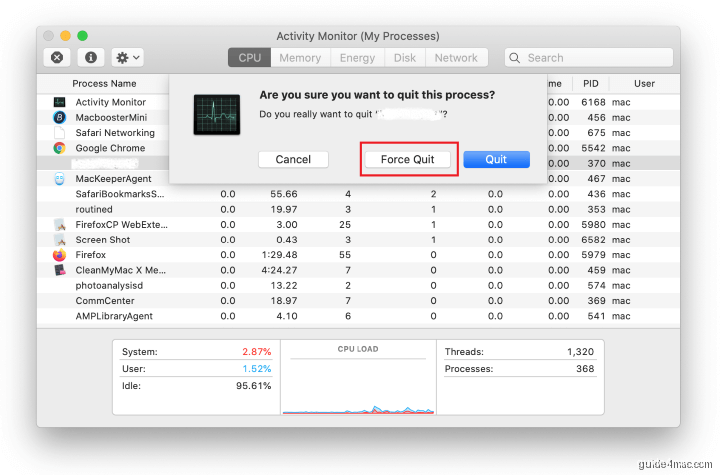
- Scan the process list for anything unfamiliar that is consuming significant CPU or memory. The process name rarely matches the threat name, so focus on entries you don’t recognise. Select the suspicious process and click the Stop (X) button in the top-left corner.

- When the confirmation dialog appears, click Force Quit.
Step 2: Remove Malware Files from Library Folders
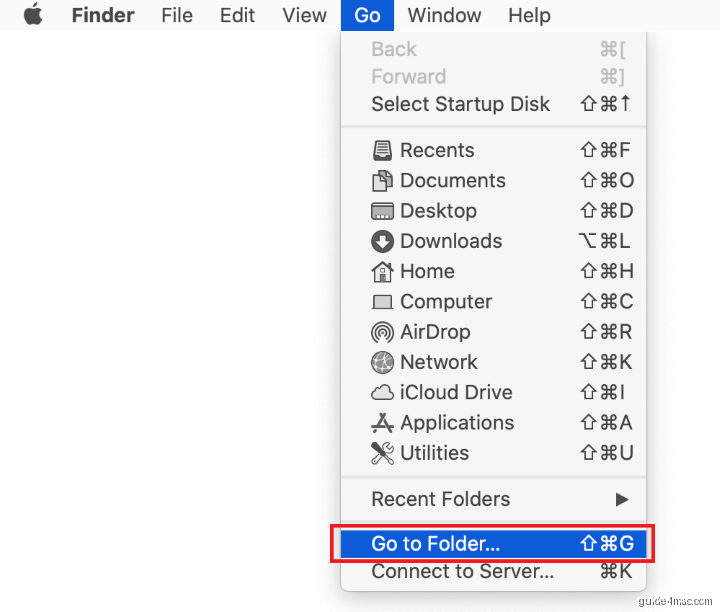
Malware on Mac typically plants persistence files across four Library locations. Check each one. Use Go > Go to Folder in Finder (or press Command-Shift-G) to navigate directly. If a path inside these folders turns out to be a symbolic link, see our symlinks guide to check where it points.
- Click the Go menu in Finder and select Go to Folder.
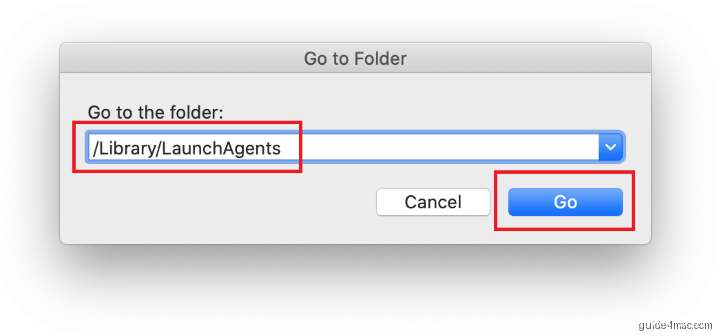
- Type
/Library/LaunchAgentsand click Go.
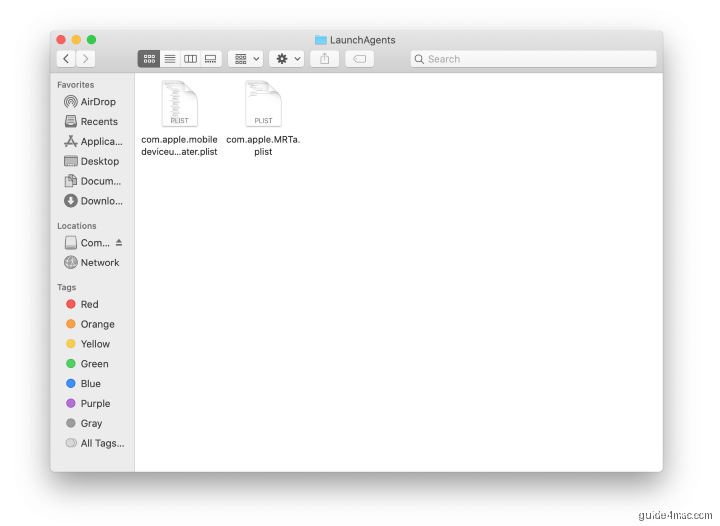
- Look for recently added .plist files with unfamiliar names. Known malicious examples include
com.pcv.hlpramc.plist,com.updater.mcy.plist,com.avickUpd.plist, andcom.msp.agent.plist. Drag any suspicious files to the Trash.
- Return to Go to Folder and type
~/Library/Application Support(include the tilde). Click Go.
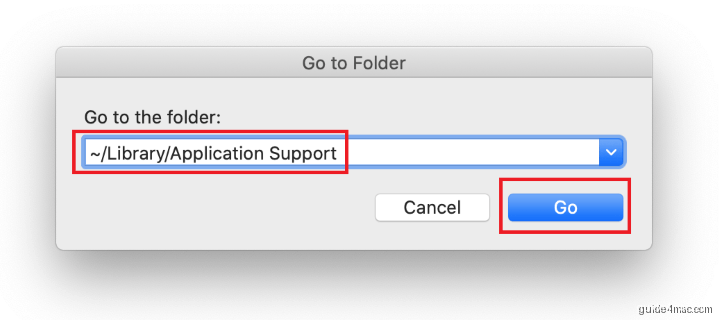
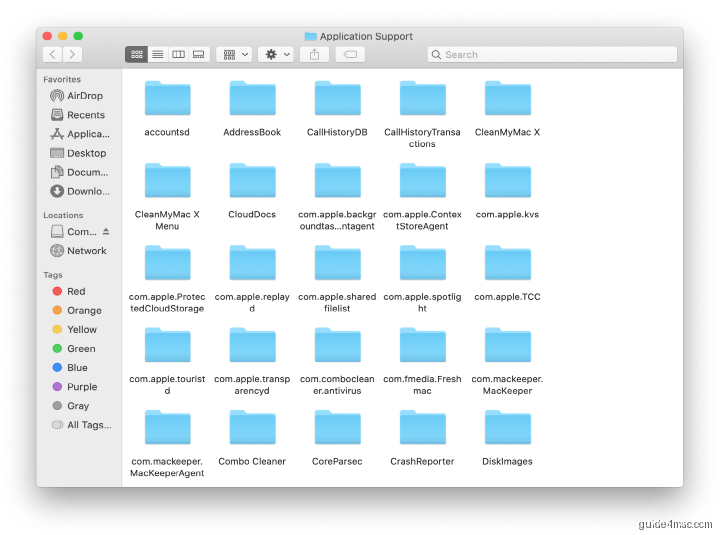
- Look for recently created folders whose names have no connection to Apple products or apps you knowingly installed. Known malicious folder names include
nbp,UtilityParze,ProgressSite, andIdeaShared. Drag any suspicious folders to the Trash.
- Open Go to Folder again and enter
~/Library/LaunchAgents.

- This folder contains LaunchAgents for your current user account only. Apply the same logic as step 3: look for unfamiliar or recently added .plist files and drag suspects to the Trash.

- Open Go to Folder and type
/Library/LaunchDaemons.
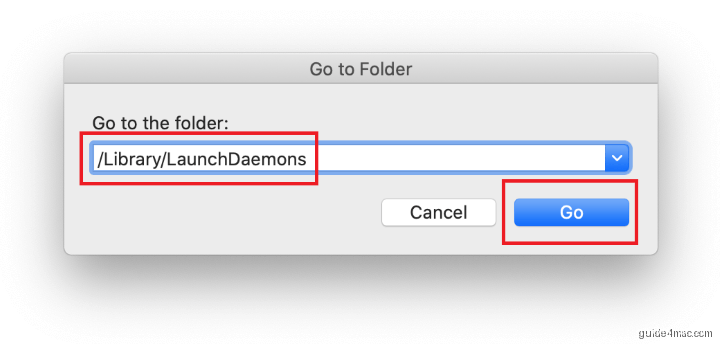
- LaunchDaemons run at the system level and persist across all user accounts. Known malicious examples include
com.pplauncher.plist,com.startup.plist, andcom.ExpertModuleSearchDaemon.plist. Delete anything suspicious immediately.

Step 3: Delete the Malicious App from Applications
- Click the Go menu in Finder and select Applications.
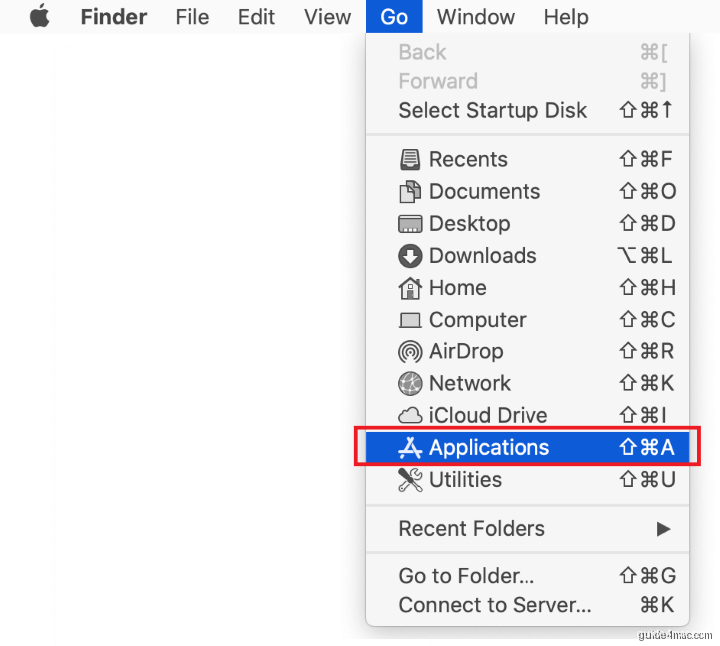
- Find any app you don’t recognise or didn’t intentionally install. Drag it to the Trash. Enter your admin password if prompted.

Step 4: Remove the Rogue Login Item and Configuration Profile
Many adware bundles add themselves as login items and install a configuration profile that locks browser settings. Both need to go.
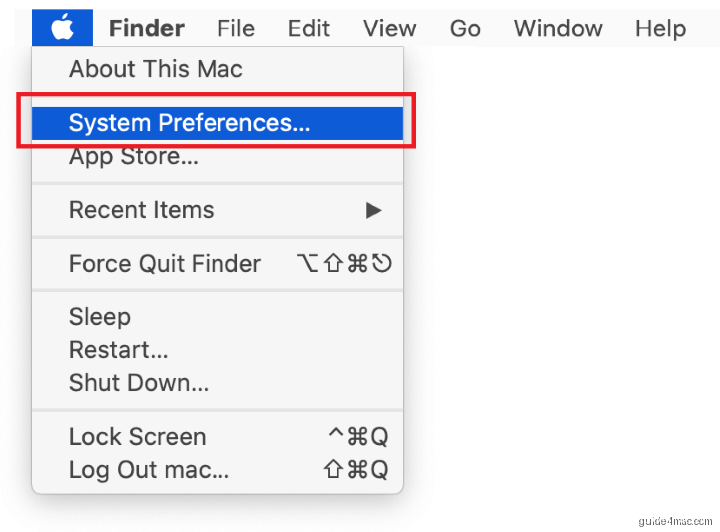
- Click the Apple menu and open System Preferences (macOS Monterey and earlier) or System Settings (macOS Ventura and later).
- Go to Users & Groups and click the Login Items tab. Find the unwanted app on the list and click the – (minus) button to remove it.

- Navigate to Profiles in System Preferences (or System Settings > Privacy & Security > Profiles on Ventura and later). If you see an unfamiliar profile such as TechSignalSearch, MainSearchPlatform, AdminPrefs, or Chrome Settings, select it and click the – button to delete it.
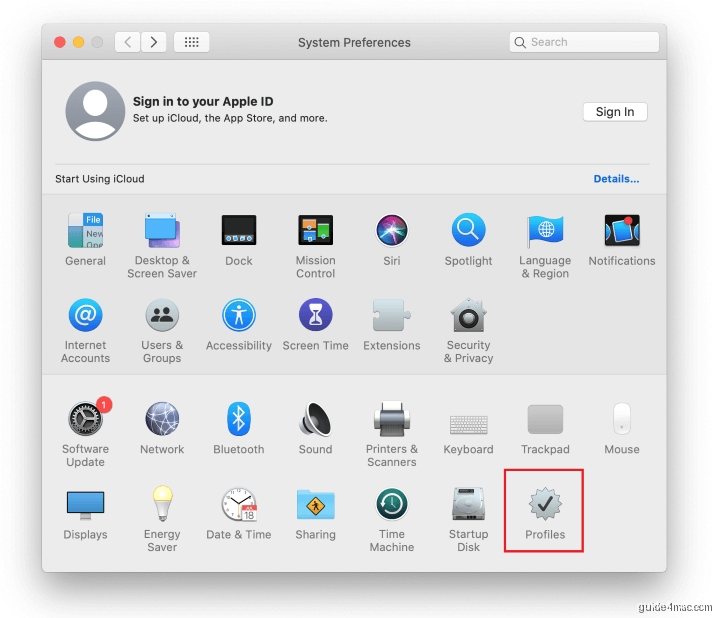
If your Mac was running macOS Ventura (13), Sonoma (14), or Sequoia (15) when the adware was installed, the Profiles pane sits under System Settings > Privacy & Security rather than at the top level of System Preferences. Scroll to the bottom of that Privacy & Security screen if you don’t see it immediately.
Remove the “Browser Is Infected” Pop-Up in Safari, Chrome, and Firefox
Even after the underlying files are gone, the browser still holds the rogue notification permission and potentially hijacked settings. Reset each affected browser separately.
Safari
- Open Safari and click Safari in the menu bar, then select Settings (macOS Ventura and later) or Preferences (macOS Monterey and earlier).

- Click the Websites tab, then select Notifications in the left sidebar. Find the malicious site in the list on the right and click Deny or use the Remove button to delete the entry entirely.
- Click the Extensions tab and uninstall any extension you don’t recognise by selecting it and clicking Uninstall.
- Click the Privacy tab and select Manage Website Data. Click Remove All to clear cookies and cached data from rogue sites.
- In the General tab, verify your Homepage field still points to your preferred URL. If it has been changed, update it now.
- Click the Advanced tab and enable Show Develop menu in menu bar. Then click Develop in the menu bar and select Empty Caches.
Google Chrome
- Open Chrome and click the three-dot menu in the top-right corner, then select Settings.
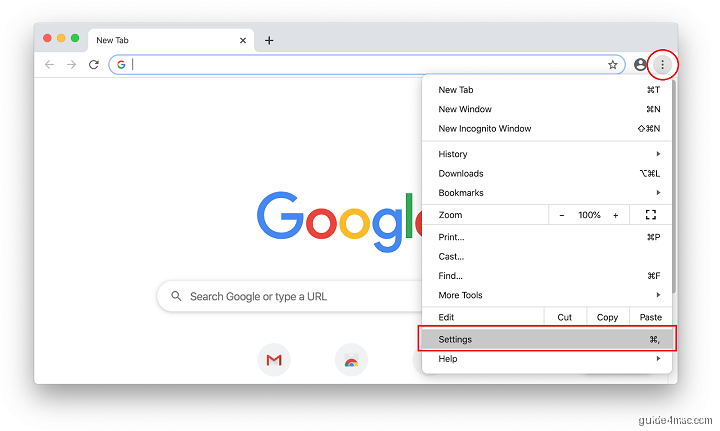
- Go to Privacy and security > Site Settings > Notifications. Under Allowed to send notifications, find the offending site and click the three-dot icon next to it, then select Remove.
- Go to Extensions (three-dot menu > Extensions > Manage Extensions) and remove anything unfamiliar.
- Go back to Settings and scroll to the bottom. Click Reset settings > Restore settings to their original defaults > Reset settings to clear any hijacked startup page, search engine, or pinned tabs.
If Chrome still shows a “Managed by your organization” notice after these steps, a configuration profile is enforcing that policy. The Terminal section below explains how to detect and remove it.
Mozilla Firefox
- Open Firefox and click the three-line menu, then go to Settings > Privacy & Security > Permissions > Notifications. Click Settings next to Notifications, find the rogue site, and set its status to Block. Click Save Changes.
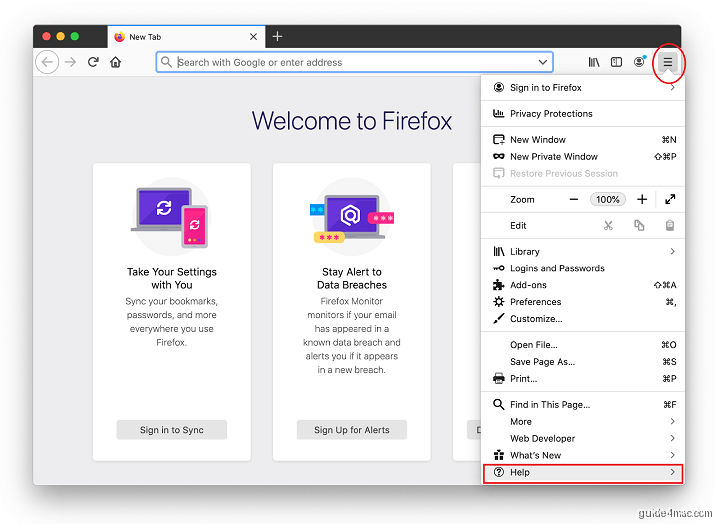
- To reset Firefox fully, click the three-line menu and select Help > More Troubleshooting Information. Click Refresh Firefox and confirm. This restores default settings while keeping your bookmarks.
Detect “Browser Is Infected” Malware from the Terminal
The Finder steps above handle the visible file removal. These Terminal commands let you verify what the GUI can’t easily show: loaded launch agents, active proxies, and DNS tampering. All commands in this section are read-only diagnostics. If they turn up something serious, follow our complete MacBook virus removal guide.
Check Loaded Launch Items
- Open Terminal (found in Applications > Utilities).
- Run the following command to list all non-Apple items currently loaded by launchctl:
launchctl list | grep -v com.appleA clean Mac shows only a handful of entries from known developers. Any entry with a numeric PID (first column) that you don’t recognise warrants investigation. Cross-reference the name against the .plist files you inspected in the Library steps above.
- Inspect the persistence folders directly to confirm no files were missed:
ls -la ~/Library/LaunchAgents /Library/LaunchAgents /Library/LaunchDaemonsEach folder should contain only .plist files from software you recognise. Any file with a random string in its name or a very recent modification date is suspicious.
Check for Hidden Persistence: Proxy, DNS, and Hosts File
Some adware bundles alter your network proxy or DNS settings to intercept traffic after the main app is removed. Run these read-only checks.
- Check for a rogue web proxy (replace
Wi-FiwithEthernetif you connect via cable):
networksetup -getwebproxy Wi-Fi
networksetup -getsecurewebproxy Wi-Fi
networksetup -getsocksfirewallproxy Wi-Fi
All three should return Enabled: No. Any result showing Enabled: Yes with an unfamiliar server address means a proxy was set without your knowledge.
- Check your DNS servers:
networksetup -getdnsservers Wi-FiA clean result says “There aren’t any DNS Servers set on Wi-Fi” (meaning your router handles DNS automatically) or shows addresses belonging to a trusted provider like Google (8.8.8.8) or Cloudflare (1.1.1.1). Unknown IPs here mean your DNS has been hijacked.
- Inspect the hosts file for rogue redirects:
cat /etc/hostsA clean hosts file contains only lines starting with # (comments) and the standard 127.0.0.1 localhost and ::1 localhost entries. Any additional domain entries pointing to unfamiliar IPs are red flags.
- Check for installed configuration profiles:
profiles listOn a clean Mac this command returns nothing, or only profiles from your employer or a known MDM (Mobile Device Management) service. Any profile with a generic name like AdminPrefs or a long random identifier you don’t recognise should be removed via the GUI steps in Step 4 above.
Fix a Hijacked Proxy or DNS (if Detected)
Only run these commands if the diagnostics above returned unexpected results.
- Disable a rogue web proxy:
networksetup -setwebproxystate Wi-Fi off- Reset DNS to automatic (removes any hardcoded rogue servers):
networksetup -setdnsservers Wi-Fi Empty- If the hosts file contained rogue entries, open it for editing: This command opens a text editor with elevated privileges. Only delete lines you did not add yourself.
sudo nano /etc/hostsDelete the suspicious lines, then press Control-O to save and Control-X to exit.
How TO Find These Settings macOS Ventura, Sonoma, and Sequoia?
Apple restructured system settings in macOS Ventura (13) and the layout has carried through Sonoma (14) and Sequoia (15). Several paths referenced in older guides no longer work. Here’s where each relevant setting lives now.
Login Items and Background Extensions
Open System Settings > General > Login Items & Extensions. The top section lists apps that open at login. The Allow in the Background toggle list below it shows processes that run silently without a visible window. Both lists need to be checked. Remove anything unrecognised from either section using the – button.
Configuration Profiles
Go to System Settings > Privacy & Security and scroll to the very bottom. If any profiles are installed, a Profiles entry appears there. It is hidden when no profiles are present, so its absence is a good sign. Select any unfamiliar profile and click the – button to remove it.
XProtect Signature Status
macOS ships with XProtect, Apple’s built-in malware signature database, which updates silently in the background. You can confirm it is current by running this read-only command in Terminal:
system_profiler SPInstallHistoryDataType | grep -A4 XProtectThe output shows the most recent XProtect update date and version. If the date is more than a few weeks old, ensure your Mac is not blocking background updates under System Settings > General > Software Update > Automatic Updates.
How To Verify If the “Browser Is Infected” Scam Is Fully Gone?
After completing all removal steps, run through this post-cleanup checklist to confirm nothing was missed.
- Re-run
launchctl list | grep -v com.applein Terminal. No unfamiliar entries with active PIDs should remain. - Re-run
ls -la ~/Library/LaunchAgents /Library/LaunchAgents /Library/LaunchDaemons. The only .plist files present should be from software you recognise. - Re-run
profiles list. The output should be empty, or show only trusted profiles you intentionally installed. - Re-run the three proxy checks. All should return
Enabled: No. - Open each affected browser and navigate to its notification permissions. The malicious site’s entry should no longer appear under Allowed.
- Restart your Mac and wait two to three minutes. No “Browser is infected” notifications should appear on the desktop after the restart.
- Open System Settings > General > Login Items & Extensions and confirm no unfamiliar entry has re-added itself after the reboot.
If notifications reappear after a restart, a configuration profile is likely re-installing the permission. Re-check the Profiles pane under System Settings > Privacy & Security and remove any profile that reappeared. Safari’s privacy features provide some protection against notification abuse by default, but they can’t override a permission you’ve already granted at the OS level.
Common Mistakes When Removing the “Browser Is Infected” Scam
These are the four errors that cause incomplete removal and lead to the alerts coming back.
- Changing the default search engine without removing the configuration profile first. A rogue profile overrides your browser’s search engine setting every time the browser restarts. The profile must go before browser settings will stick.
- Turning off all notifications system-wide to stop the pop-ups. This kills legitimate alerts from Calendar, Mail, and messaging apps. The correct fix is to revoke the specific permission from the rogue site inside your browser’s notification settings.
- Emptying the Trash before restarting. Some users empty the Trash and restart, only to find the malware re-launches from a plist that was still loaded in the current session. Restart first so macOS attempts to load the agents, fails because the files are gone, and clears the reference. Then empty the Trash.
- Assuming the problem is browser-specific and only resetting one browser. If you granted the notification permission in Safari but also use Chrome, the underlying adware files affect both. Complete the Library folder cleanup before resetting any individual browser, or the second browser can become the new infection vector.
Frequently Asked Questions
No. The alert is a fake warning generated by a rogue web push notification permission. Your browser itself is not infected with a virus. A deceptive website tricked you into allowing it to send notifications. Clicking anything inside the alert can lead to a real threat, but the alert itself is a scam designed to frighten you into downloading something harmful.
macOS delivers web push notifications at the operating-system level, so they appear even with your browser closed. You need to revoke the notification permission from inside the browser that granted it. In Safari, go to Settings > Websites > Notifications and remove the offending site. In Chrome, go to Settings > Privacy and security > Site Settings > Notifications and remove it from the Allowed list. In Firefox, go to Settings > Privacy & Security > Notifications and block the site.
If the only symptom is the pop-up alerts, revoking the notification permission is enough. A full browser reset is recommended when you also notice a changed homepage, a different default search engine, unfamiliar extensions, or if you downloaded something from a linked page. In those cases, a full reset clears all residual configuration changes in one step.
The most common reason is an active configuration profile that re-grants the permission after each restart. Open System Settings > Privacy & Security and scroll to the Profiles section. Delete any profile you don’t recognise. A second cause is a persistence file in /Library/LaunchAgents or /Library/LaunchDaemons that re-launches the adware. Work through the full manual removal steps above to clear all persistence locations.
The notification itself cannot steal data. The risk comes from interacting with it. Clicking the embedded link can take you to a page that installs credential-harvesting software, pushes a fake cleaner that does nothing, or connects you to a fake support agent who asks for remote access to your Mac. Remote access is where actual data theft or paid-fix scams occur. If you clicked any link inside the alert, run the full manual removal procedure and change passwords for accounts you accessed recently.
macOS XProtect handles traditional malware signatures and updates automatically in the background. However, notification permission abuse is technically not a file-based infection, so XProtect does not flag the rogue permission itself. Safari’s Intelligent Tracking Prevention can limit some cross-site tracking, but it cannot revoke a permission you already granted. The most effective protection is preventing the permission from being granted in the first place: never click Allow on a notification prompt from an unfamiliar site.
Yes. The linked pages in these alerts are designed to look like legitimate security scan results but are entirely fabricated. They report infections that don’t exist and push downloads that range from useless to actively harmful. Some pages route to fake tech-support operations that request remote access to your Mac. Never download software from a page you reached by clicking inside one of these alerts, and never call a phone number displayed on such a page.



0 Comments